If you haven’t noticed by now, church websites have been popping up all over the internet. Some are good…some are not so good. Whether you have a church of 3,000 or 300, a website is a great tool for showing others about the church and connecting with new visitors. The best part is that a good looking website doesn’t have to cost the church thousands of dollars. Sure, there are sites that are custom made and cost a lot of money to build, but your church site can still look great without breaking the bank.
A great church website has room to grow and add features like a church blog, videos, sermon podcasts, and a newsletter. With the right direction in mind, you can make your church website much more than an online bulletin.
This article is designed to guide you through the steps in building your church website (or any website for that matter). The truth is, you don’t need to spend thousands of dollars to put a church website together. As you’ll see, you can actually put up a site for less than $100.
The Domain
Every website has a domain. This is the www.________.com. In fact, there are a lot of different extensions that can be on the end of your domain – .com and .org are the most common (.org especially for churches). You can also use extensions like .net, .tv, .biz, .us – but I recommend staying with the big three – .com, .org, and .net.
Each domain is unique and you’ll need to do a search to see if a domain is available. I recommend using Domize.com to find out if a domain name is available. If you’re having trouble coming up with a domain name, I’ve found the site NameBoy to be helpful in suggesting ideas for a unique domain that is available.
When you’ve found an available domain, wait to purchase it until you’ve found a hosting site. This will make the process a little smoother, as the domain and hosting site will be together. (It’s just a simple convenience tip)
Domain Search Tips
- Try to use the church name in the address.
For example: If your church is called ABC Community Church, then do a search for www.abccommunitychurch.com. This site is available. However, if you find that a name is taken, try inserting the city in the name. Ex. ABCChurchOrlando.com.
- Try to avoid double letters – like the example above.
- If the .com and .org are available, consider purchasing both – it’s usually just $10 a year for registration and holding both .com and .org is good in case someone types in the wrong extension for your domain.
Webhosting for Your Church Website
A hosting company is what makes your website visible to the internet. It’s like your gateway to be found. Basically, you pay about $10 a month for the hosting site to store all your website’s files. These files make your website visible.
Recommended Hosting Sites
I have used 4 different webhosting companies and Hostgator and Bluehost are my two favorites for smaller websites. They are both very good hosts, but there are a few reasons I like Hostgator more and have all of my small to medium sites hosted with them.
So, if you are going to build a church website, I would recommend going with Hostgator.
Step-by-Step Instructions
To make this really simple, I am just going to give you some step-by-step instructions to help you get your church website up and running in no time. One of the reasons I recommend Hostgator is because they really have fantastic customer support via phone, chat, or email. If you have any issues getting this set up, don’t hesitate to call them – that’s why you are paying them!
1. Get a domain name and web hosting package from Hostgator (recommended host)
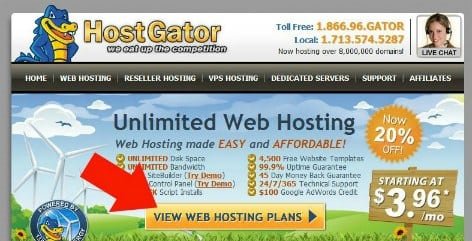
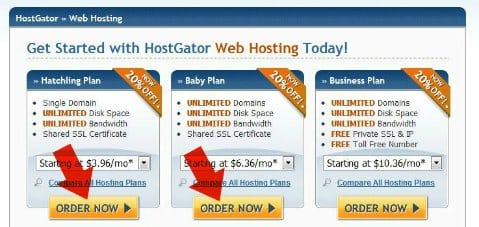
- Head over to Hostgator and select either the “Hatchling” or “Baby” plan.
- Don’t worry about getting any of the add-ons. You really don’t need any of them and if you decide you do, you can get them later.
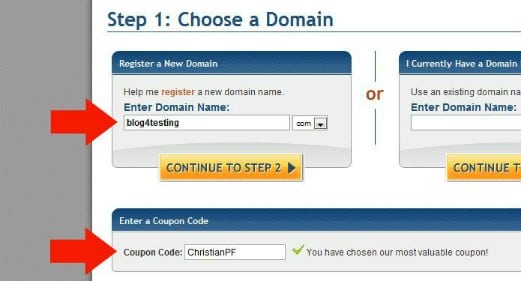
- Then make sure to register the domain that you found in the first step.
- Next enter “CPFguide25” as a promo code and it will knock 25% off for you.
- Now follow the remaining steps to complete your purchase.
3. Install WordPress (with a little help)
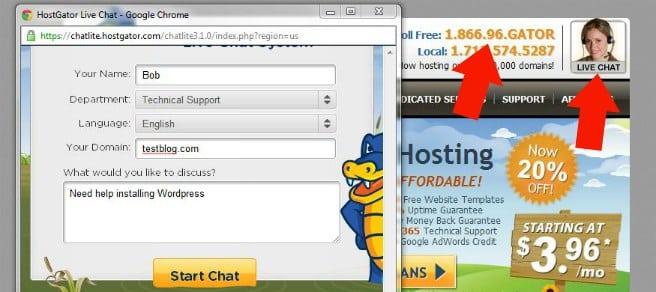
- Either watch this video for detailed instructions or just jump on the phone or use the chat box with Hostgator.
- When you get them on the line just tell them that you want to install WordPress on your blog.
- They should hold your hand and walk you through the process (if they don’t please email me). When complete ask them for the WordPress login information.
4. Login to WordPress
- Once they give you the login information you can go to http://www.yourdomain.com/wp-admin and login.
- Now that you are logged in to WordPress you can begin making changes to your site.
Adding Content
At this point you should be logged into your site and now we can get started adding some of the pages to your site. On the left side of your page you should have a link that says “Pages”, just hover your mouse over that and then click “Add New” like below:
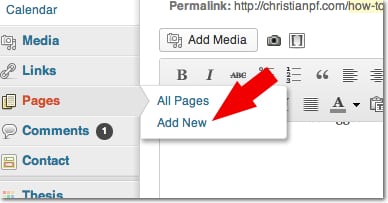
Now you can just start creating the pages you want on your site by adding text, images, video, etc. Don’t worry about making everything perfect yet, you can always edit them later. For now, just get a few pages created so we can move to the next step.
Designing Your Website
At this point you should have your website up and running with a few pages. If you haven’t yet, you can type your domain name in and you’ll be able to see what it looks like with the default theme.
You are welcome to use the default theme, but if you really want to get a good looking church site, you need to find a WordPress theme created specifically for churches.
You can search the WordPress Theme directory and you may be able to find some decent ones, or you can do a Google search for “wordpress church theme”, or if you want a head start I found a page that will give you a headstart with 30 options here.
Installing the Theme
Once you’ve found a theme you like, simply download it and upload it to WordPress. Uploading the theme can be done through your site’s WordPress backend by clicking Appearance/Themes/Install Themes/Upload. The downloaded theme will be in a .zip file and WordPress will take care of the rest once you upload it.
Many themes have custom features that allow you to choose your own color for the site as well as the option to add or remove site features. I would probably start by playing around with all the site customizations to start getting a feel for what you can do.
Design Customizations
Assuming you went with ChurchThemes.net, I created a quick video tutorial to show you some of the basics:
If you are looking to do major design changes to the site I would suggest going to Elance.com or Odesk.com and hire a well-rated WordPress Developer to help you accomplish what you need to get done.
Additional Functionality
WordPress gives you the ability to add plugins and widgets to your site, which can add some optional yet awesome features to your site very quickly. Here’s a list of some great plugins that will make your church site stand out.
1. All In One SEO Pack: Gives you the ability to improve your on-site search engine optimization. This plugin allows you to easily update your site’s title, description, and keywords for your site as well as for each individual page or post.
2. Google XML Sitemaps: This plugin allows Google to easily ‘crawl’ your site. It makes it easier for Google to read your site and show it to others when they do a search for content related to your website.
3. Akismet: If your church has a blog (and I recommend that it does), you’ll want to install Akismet to your site. This keeps the spam comments from showing up on your posts. Another excellent plugin to add is Conditional Captcha. Sometimes Akismet will block legitimate comments, so conditional captcha will help it to differentiate from spam and upstanding citizens.
4. Audio Player: If you plan on including recorded sermons or other audio to your site, this plugin will make your life so much easier. It’s easy and looks professional!
5. Contact form 8 Having a way for your visitors to connect with your church is important. Creating a “Contact us” form with this plugin is easy and gives your visitors a way to connect with your church.
Social Media
Connecting with your congregation doesn’t have to be just on Sunday and Wednesday. By using outlets like Facebook and Twitter, you can encourage others throughout the week and provide important updates and other news instantly. Links for Facebook and Twitter can be added right to your website too!
Facebook – Create a fan page for your church and link to it from your website. You can highlight the blog posts from your site and encourage communication between church members right through the church’s fan page.
Twitter – You’d be surprised how many people in your church are on twitter, and creating a church account is simple. It’s a great way to get news or updates out to people quickly and to share fun or thought provoking ideas throughout the week.
Costs – The Bottom Line
Setting up a church website doesn’t have to be expensive. Your main costs will include:
- Domain Name – $10/year
- Hosting – About $10/month
- Theme – $0-$75
If you’ve followed the steps outlined above your overall costs to building a church website should be under $100. There are a lot of webdevelopers out there charging over $3,000 for a church site and many of them will use a theme for WordPress. If you can read instructions, you can follow the guides on Hostgator and WordPress and save thousands creating your church’s website.
Need more instruction?
If are wanting more instruction on how WordPress works, I suggest looking into my Blogging 101 course. While it isn’t specifically geared towards those creating a church site, it will give you a solid foundation of the WordPress platform and definitely help you get more comfortable in the backend of your website. You can see whats covered in the course here.
Does your church have a website? Include it in the comments below to give others an idea of church website designs and features they might want to include.
Full disclosure: I am an affiliate with Hostgator, so if you use those links you are helping support this site financially – and I appreciate it! But like all products I am an affiliate for, I only recommend stuff I use and love. I host 99% of my websites with Hostgator myself and have used them for 4+ years and highly recommend them.


